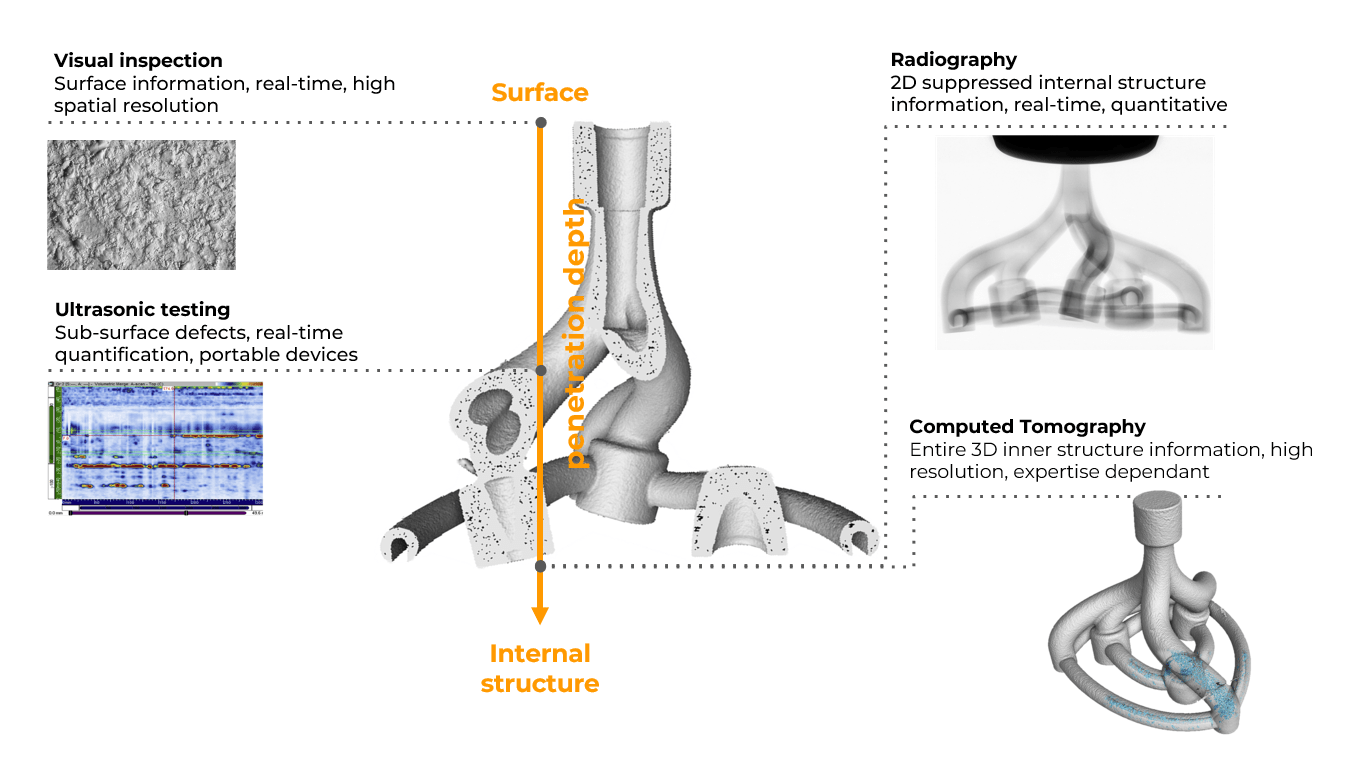
Non-Destructive Testing Techniques (NDT) have emerged as powerful tools for quality control, safety assessment, and innovation across various industries. Unlike traditional Destructive Techniques (tensile testing, hardness testing, etc.), they enable the control materials and the hidden structures of components without destruction of the part. Therefore, NDT can decide about part faultiness early in the production process and thus save both time and resources.
Most widely used, according to the Frost & Sullivan NDT market report, NDT techniques are Radiography and CT Equipment (30.8 % market share), Ultrasonic Test Equipment (30.5 % market share) and Visual Inspection Test Equipment (21.6 % market share). Each of these techniques has unique advantages, applications, and limitations.

Radiography (RT)
Radiography (RT) is one of the most widely used non-destructive testing (NDT) techniques for evaluating the internal structure of materials and components. RT employs X-ray radiation to create images of objects’ internal structure, making it a highly effective technique for detecting internal defects like cracks, voids, inclusions, and porosity. Its ability to penetrate through thick and dense materials and its real-time efficiency and quantitative analysis capabilities make it a solid choice for high-throughput manufacturing.
Radiography provides high-resolution imaging, enabling material characterization and defect localization. Furthermore, it complies with industry standards. However, the utilization of ionizing radiation entails the need for radiation exposure management and a commitment to regulatory compliance. The quality of results may be affected by artefacts due to system conditions like unsharpness and focal spot drift. Additionally, radiography does not provide insight into the 3D inner structure of analyzed samples. It is usually limited to testing planar samples such as PCB boards.
Computed Tomography (CT)
Computed Tomography (CT) represents an advanced NDT technique that extends conventional radiographic inspection. CT works by capturing a series of X-ray images from different angles and subsequently reconstructing them into cross-sectional slices, thereby enabling a comprehensive evaluation of an object’s internal and external features.
CT is well-known for its 3D visualization and high resolution. It allows for quantitative analysis, material characterization, and density mapping. CT’s versatility extends to the applicability even with complex geometry samples and industry standards compliance.
Like radiography, CT uses ionizing radiation for imaging, necessitating radiation exposure management and regulatory compliance. Nevertheless, it is essential to acknowledge some limitations: CT necessitates long scanning times, large data storage requirements, and complexity of data processing. Achievable spatial resolution may require a compromise between sample size and resolution. Furthermore, the method is operator-skill and expertise-dependent.
Ultrasonic testing (UT)
UT is based on propagating high-frequency sound waves into materials. When an ultrasonic wave encounters a defect, a part of the wave is reflected. This returning wave is then converted into an electrical signal and further analyzed to locate and characterize the defect.
With high sensitivity and spatial resolution, UT techniques excel in detecting sub-surface defects, such as cracks, voids, and inclusions. They provide depth assessments, help locate defects accurately, and offer real-time quantification.
The UT devices are often designed to be portable, making them suitable for on-site inspections. The control with UT techniques complies with industry standards.On the other hand, they are limited to providing information about the surface and subsurface layers and need more details on the inner 3D structure. They are most effective with materials that have good acoustic properties, such as metals and plastics.
The quality of results can be affected by surface preparation, and the technique may need to be compatible with samples with complex geometry. Additionally, the results depend on the expertise of the operator. Calibration is necessary for quantitative analysis.
Visual testing
VT is one of the most straightforward and widely used NDT techniques, serving as the basis of the quality control process. It can employ simple means, such as natural light and the bare eye, or sophisticated setups involving cameras, lenses, or mirrors to capture and evaluate the object’s surface condition.
Optical systems for visual testing offer high spatial resolution, real-time, and efficient analysis, making them suitable for high-throughput manufacturing. They often support quantitative analysis and dimensioning; some even provide 3D imaging capabilities through 3D scanners. Automation is possible, making these systems a cost-effective solution in high-volume production.
One fundamental limitation of visual testing is that no information about the internal structure of objects is provided. This makes the technique unsuitable for applications where internal defect detection is necessary. Therefore, it is primarily used for detecting visible surface defects.
Summary and conclusion
Non-destructive testing (NDT) encompasses a wide range of inspection techniques, each suited to different inspection goals, materials, and defect types. Selecting the appropriate NDT method requires a clear understanding of the inspection requirements, expected outcomes, and practical constraints.
Among the various NDT approaches, X-ray-based methods play a key role in modern industrial inspection. Conventional radiography offers fast and reliable internal defect detection, while computed tomography extends NDT capabilities by providing full three-dimensional insight and advanced quantitative analysis. Together, these techniques form a complementary toolkit within the broader NDT framework.
At CactuX, we focus on X-ray non-destructive testing, with particular expertise in radiography and computed tomography. Our solutions combine deep technical know-how with practical industrial experience to deliver reliable and efficient NDT inspections. Want to know more about our services? Contact our experts or learn more about our solution here.